return to nonprint version
Steps
Introduction
The flared skirt can be a simple A-line shape, or can have multiple flares. This version flares only at the side seams. 
Draping Front of Skirt
1
 When draping skirts begin by raising the form to a convenient height.Align the crossgrain of the muslin with the Horizontal Balance Line (HBL) and pin the fold of muslin to the center front using opposing pins. Make sure that you have at least 5" of fabric above waistline (This fabric will be dropped down to create the flare).
 2
 Place a temporary holding pin at the side seam at the HBL.
 3
 Smooth muslin from center front to Princess line.
 4
 Pin at waist.
 5
 Trim excess fabric at waist from center front to Princess line. (Cut a square of fabric away, cutting straight up the grain from the princess line). Smooth and re-pin at princess line.
 Front Flare
6
 Clip to the waist right at the princess line You will drop the muslin down from this point to form the flare.
 7
 Release holding pins at the side.
 8
 Rotate the excess fabric in a counterclockwise direction dropping the fabric down to form the flare.
 9
 Pin at waist.
10
 Trim excess fabric at waist from Princess line to side seam, clip seam.
Front Ease
11
 Pin 1/4" (total) ease tuck at waist.
 12
 Clip to waist and re-pin side seam.
 13
 Smooth fabric down side seam. Pin to side seam at bottom of seam.
 Mark Front Muslin
14
 Mark center front at waist.
 15
 Dot waist.
 16
 Mark side waist.
 Front Side Seam
17
 Pin the flare together right at the base of the form and measure. (measurement A-B).
 18
 Pencil rub the side seam.
 19
 Mark side seam right at form base.
 20
 At base of form mark measurement A-B straight out(perpendicular to the side seam) from this mark.
 21
 Trim side seam.
 22
 Once front panel is fully marked and trimmed fold it away from the side seam and pin.
 Draping Back of Skirt
23
 Align the crossgrain of the muslin with the Horizontal Balance Line (HBL) and pin the fold of muslin to the center back using opposing pins.
 24
 Place a temporary holding pin at side seam at the HBL.
 25
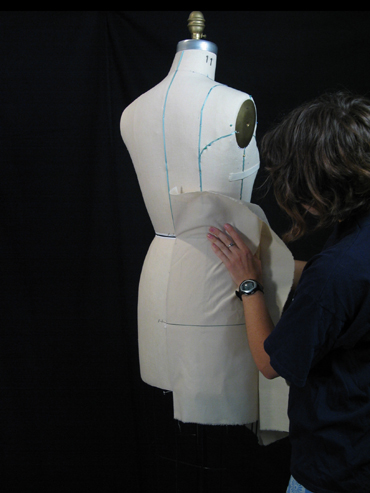 Smooth muslin from center back to Princess line and pin at waist.
 26
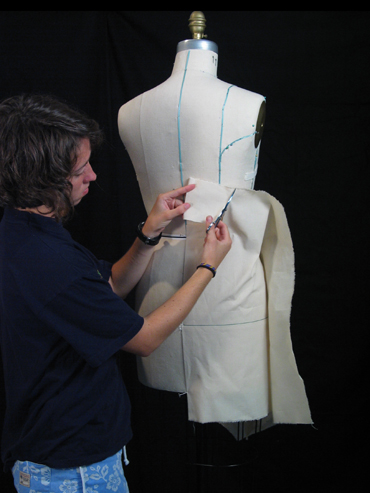 Trim excess fabric at waist from center back to Princess line (cut straight up the grain from the princess line). Smooth and re-pin at princess line.
 27
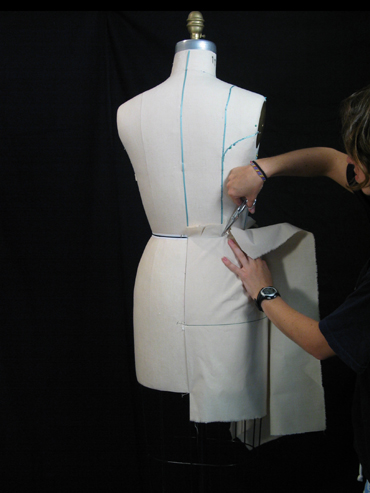 Clip to waist right at Princess line.
 Back Flare
28
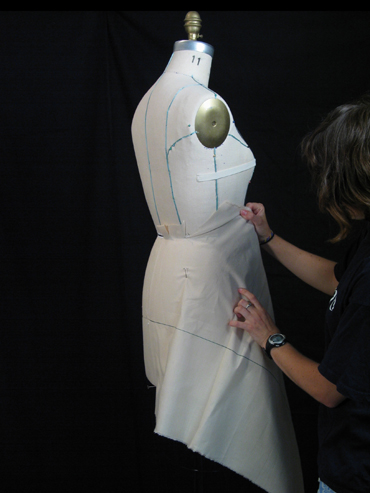 Release holding pins and rotate the excess fabric in a clockwise direction dropping the fabric down to form the flare.
 29
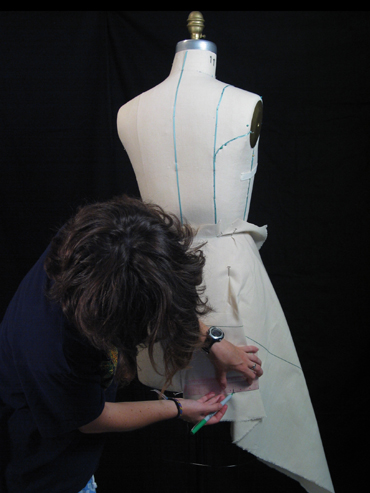 Measure flare right at base of form. Adjust the fold until the measurement matches the measurement A-B from the front drape (Lift the fabric higher at the waist to make the flare smaller, lower it to make the flare larger).
 30
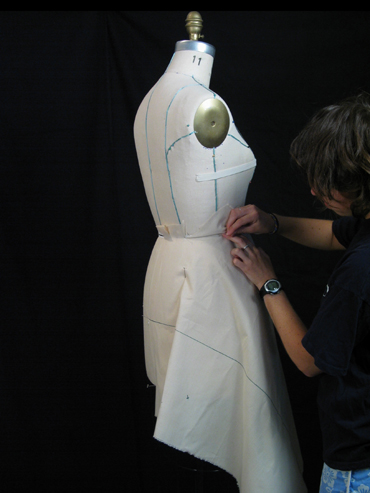 Pin at waist.
 31
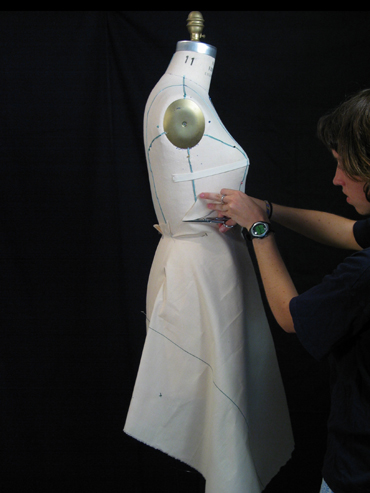 Trim excess fabric at waist from princess line to side seam, clip seam.
 Back Ease
32
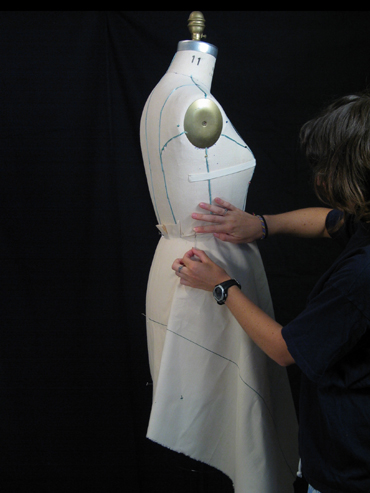 Pin a 1/4" (total) ease tuck at waist.
33
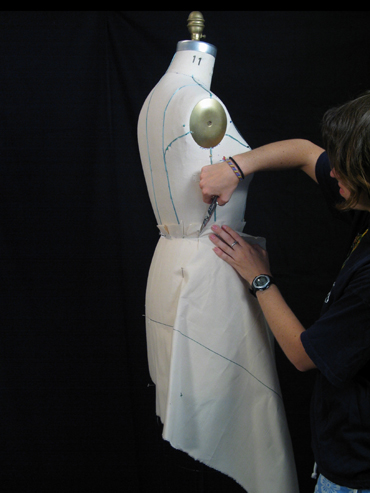 Clip to waist and re-pin side seam.
 34
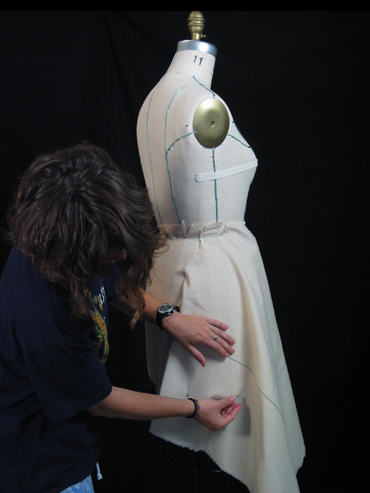 Smooth fabric down the side seam. Pin the fabric to the to side seam right at the base of the form.
Mark Back Muslin
35
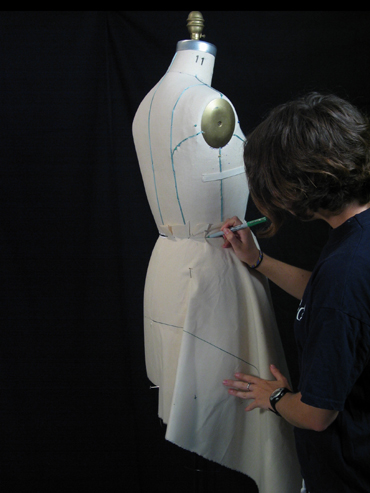 Mark center back and dot waist.
 36
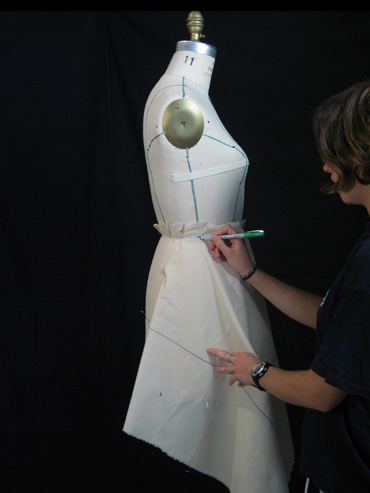 Mark waist at side seam.
 Back Side Seam
37
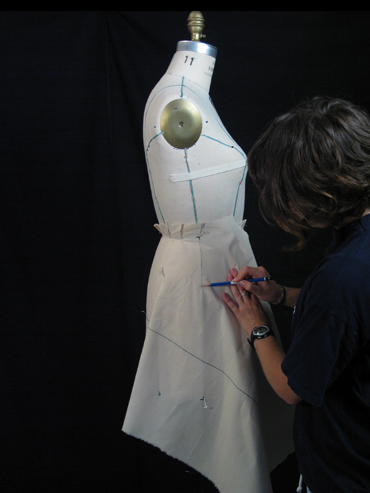 Pencil rub side seam.
 38
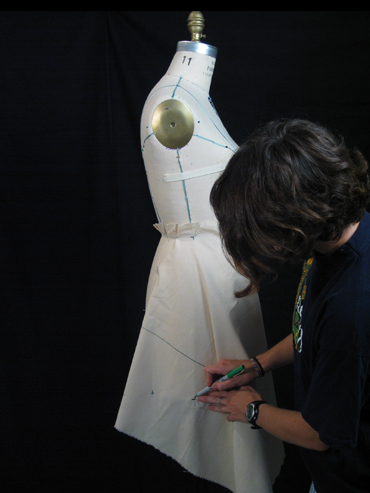 Crossmark at side base of form.
 39
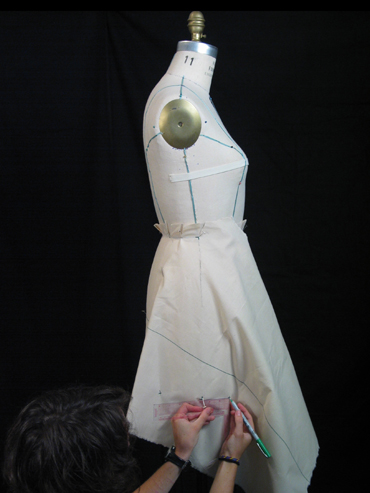 Mark A-B measurement straight out from this mark.
 40
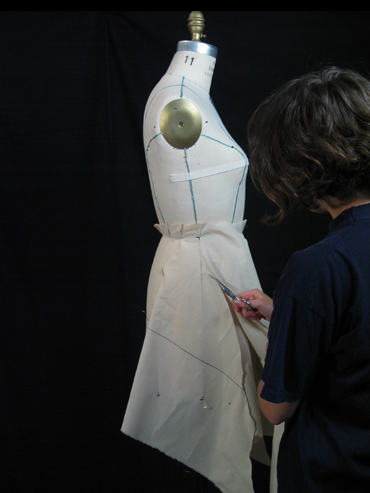 Trim side seam.
 Pin Test
41
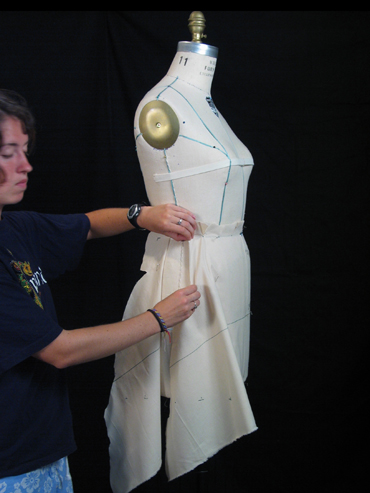 Fold the side seam of the front muslin from side waist mark to side flare measurement. Crease.
 42
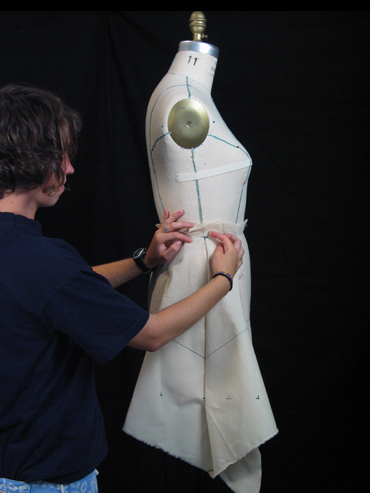 Pin front to back at waist, pin should be perpendicular to the folded seam. Do not pin to form.
 43
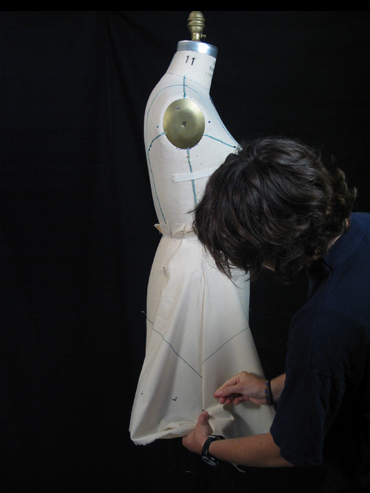 Pin at flare base.
 44
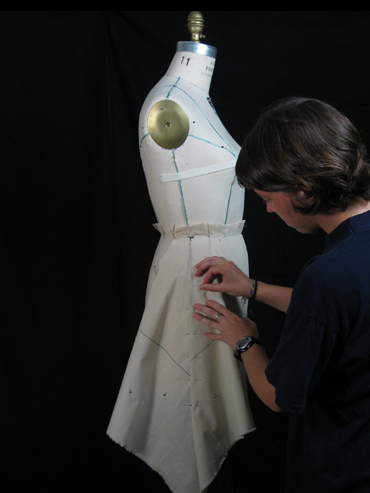 Continue to pin up entire side seam, keeping all pins perpendicular to the seam.
 Hem
45
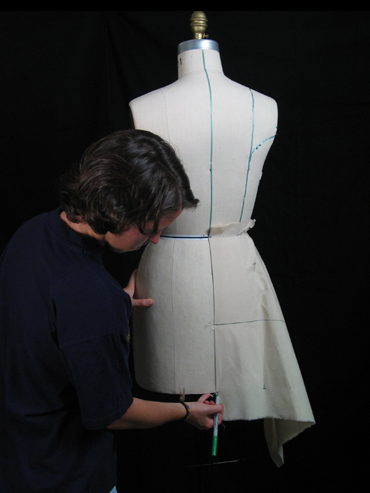 You can mark the hem either at the bottom of the form or at one of the wires of the cage on the bottom of the form (Once you mark an even hem from the form you can easily measure up or down from this hem to adjust your pattern to be closer to the length of your style). Mark the hem at Center Back and center front.
 46
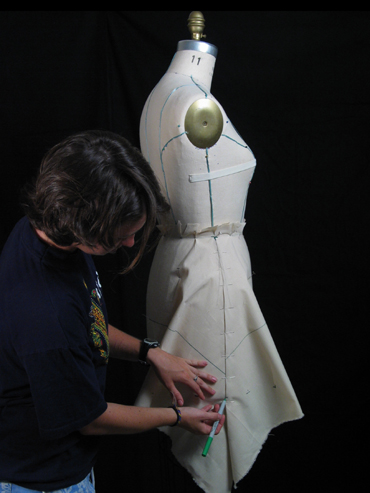 Smooth the side seam down the form and mark hem at side.
 47
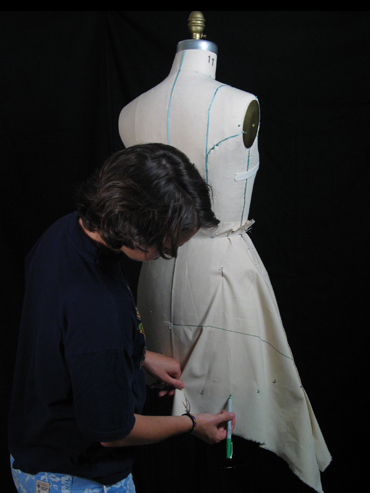 Smooth each section of skirt straight down from the waist to mark the hem at two or three locations in the back panel.
 48
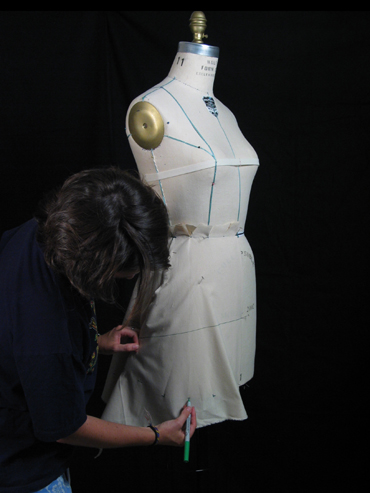 Repeat on front panel.
 49
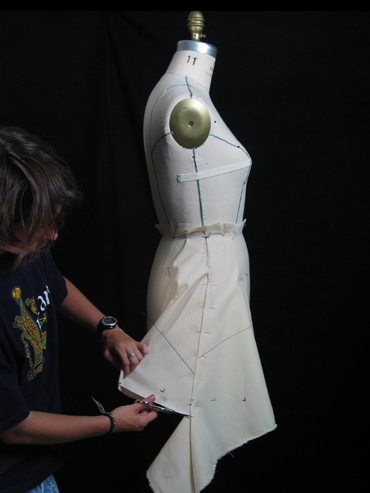 Trim muslin to within 1-1/2" of marked hem. Take the muslin off the form and unpin the side seam. Balance the side seam, then re-pin the muslin to pin test the drape.
 Finished Drape
50
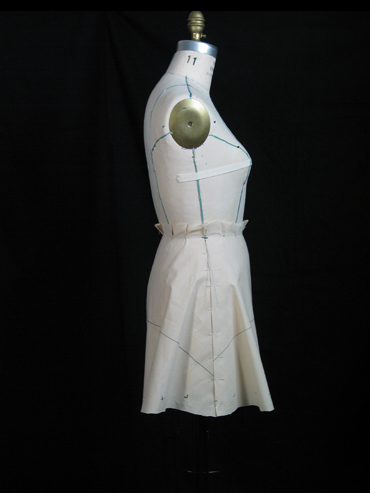 Side view of finished drape. The side seam should hang straight, perpendicular to the floor.
 51
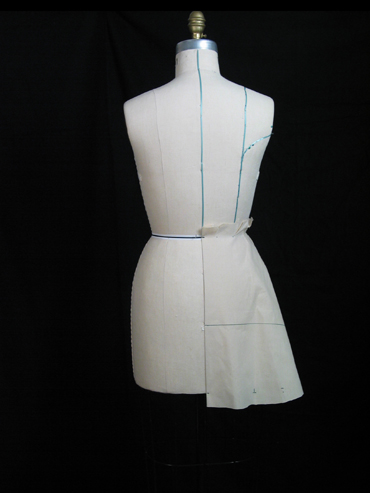 Back view of finished drape. The center back fold should hang straight.
 52
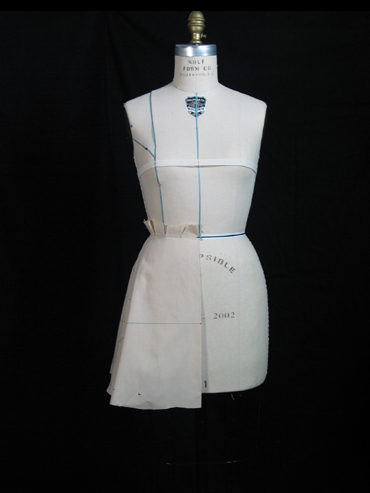 Front view of finished drape. The center front should hang straight.


 When draping skirts begin by raising the form to a convenient height.Align the crossgrain of the muslin with the Horizontal Balance Line (HBL) and pin the fold of muslin to the center front using opposing pins. Make sure that you have at least 5" of fabric above waistline (This fabric will be dropped down to create the flare).
 Place a temporary holding pin at the side seam at the HBL.
 Smooth muslin from center front to Princess line.
 Pin at waist.
 Trim excess fabric at waist from center front to Princess line. (Cut a square of fabric away, cutting straight up the grain from the princess line). Smooth and re-pin at princess line.
 Clip to the waist right at the princess line You will drop the muslin down from this point to form the flare.
 Release holding pins at the side.
 Rotate the excess fabric in a counterclockwise direction dropping the fabric down to form the flare.
 Pin at waist.
 Trim excess fabric at waist from Princess line to side seam, clip seam.
 Pin 1/4" (total) ease tuck at waist.
 Clip to waist and re-pin side seam.
 Smooth fabric down side seam. Pin to side seam at bottom of seam.
 Mark center front at waist.
 Dot waist.
 Mark side waist.
 Pin the flare together right at the base of the form and measure. (measurement A-B).
 Pencil rub the side seam.
 Mark side seam right at form base.
 At base of form mark measurement A-B straight out(perpendicular to the side seam) from this mark.
 Trim side seam.
 Once front panel is fully marked and trimmed fold it away from the side seam and pin.
 Align the crossgrain of the muslin with the Horizontal Balance Line (HBL) and pin the fold of muslin to the center back using opposing pins.
  Place a temporary holding pin at side seam at the HBL.
 Smooth muslin from center back to Princess line and pin at waist.
 Trim excess fabric at waist from center back to Princess line (cut straight up the grain from the princess line). Smooth and re-pin at princess line.
 Clip to waist right at Princess line.
 Release holding pins and rotate the excess fabric in a clockwise direction dropping the fabric down to form the flare.
 Measure flare right at base of form. Adjust the fold until the measurement matches the measurement A-B from the front drape (Lift the fabric higher at the waist to make the flare smaller, lower it to make the flare larger).
 Pin at waist.
 Trim excess fabric at waist from princess line to side seam, clip seam.
 Pin a 1/4" (total) ease tuck at waist.
 Clip to waist and re-pin side seam.
 Smooth fabric down the side seam. Pin the fabric to the to side seam right at the base of the form.
 Mark center back and dot waist.
 Mark waist at side seam.
 Pencil rub side seam.
 Crossmark at side base of form.
 Mark A-B measurement straight out from this mark.
 Trim side seam.
 Fold the side seam of the front muslin from side waist mark to side flare measurement. Crease.
 Pin front to back at waist, pin should be perpendicular to the folded seam. Do not pin to form.
 Pin at flare base.
 Continue to pin up entire side seam, keeping all pins perpendicular to the seam.
 You can mark the hem either at the bottom of the form or at one of the wires of the cage on the bottom of the form (Once you mark an even hem from the form you can easily measure up or down from this hem to adjust your pattern to be closer to the length of your style). Mark the hem at Center Back and center front.
  Smooth the side seam down the form and mark hem at side.
 Smooth each section of skirt straight down from the waist to mark the hem at two or three locations in the back panel.
 Repeat on front panel.
 Trim muslin to within 1-1/2" of marked hem. Take the muslin off the form and unpin the side seam. Balance the side seam, then re-pin the muslin to pin test the drape.
 Side view of finished drape. The side seam should hang straight, perpendicular to the floor.
 Back view of finished drape. The center back fold should hang straight.
 Front view of finished drape. The center front should hang straight.